Wednesday, January 12, 2011

How to Prep for a Decorating Event!

I know that many of you ladies out there have either decorated for an event, whether it be a child's birthday party or a huge banquet, or maybe you have helped coordinate one or even were just "along for the ride" and helped someone else pull off an event off. Whatever your involvement, you may find it easier to have a set of rules and criteria in place to help you get through all of the details. I came up with a quick and easy guideline to help even the most unorganized and/or clueless individuals get the ball rolling on a project.

So here is a little saying I came up with to get myself motivated and read ready for action:
"When planning an event and you want to prevent,
the stress and worry from being in a hurry,
for an experience that will last, don't fret have a BLAST!"

Okay so the saying is a bit cheesy but the word "BLAST" is the key word here. This acronym holds the answers to making your projects a breeze. Let me break it down for you...

B is for Budget.
You have to know your boundaries when it comes to funding. The amount of money you can spend on an event or project really determines the direction you take with it. With less funding you might have to be more creative and even spend more man hours "copying" more expensive ideas by doing your own homemade decorations. With more money at your disposal, the sky is the limit when buying decorations and you can spend less man hours on searching for cheaper alternatives to your original plans...you get the idea. You need to have a very clear understanding of what the budget is so that you don't end up fronting the bill because you overspent when there was not clear communication between those involved.

L is Location.
Again this is a key component to know your boundaries and limitations when it comes to planning. There are many places that this event could take place. What if it were held outdoors...in the winter!?! This is definitely something you should know. What if the event were held in a venue the size of a closet that looks like a time capsule from the 70's? This would be very important information to have. Always make sure to view your venue before-hand. If you cannot physically visit it, then have someone take pictures and email them to you. If you are not familiar with your venue it is even a good idea to put a rough sketch of the lay-out on paper. It doesn't have to be fancy, just another tool to help you design your event.

A is for Audience
Who is in your audience and how many will be in your audience? These are important questions that you need answers to. You will have to plan things differently for a crowd of 100 compared to a crowd of 10 so you really need to have a good estimate on how many will be there, especially when it comes to seating. The number of people is not the only thing you need to take into consideration. What about the age groups? Will this be a couples event? maybe an elderly event? or an all-female event? Will there be kids there? You will definitely need to know what genre to cater to. You would want to have a family/ kid friendly environment for a Family Christmas banquet, whereas a couples only Valentine's Dinner would have a more intimate atmosphere.

S is for Style
Something that can easily be forgotten when planning an event but yet is so important to include in your preparation, is knowing the likes, dislikes and styles of either the attendees and/or the guest of honor or knowing a requested theme. You need to know color schemes, what the parties involved would love to see at the event, what they don't want to see at the event. Or maybe there is a certain feeling or atmosphere that they want to invoke. You wouldn't want to do something that has a rustic, casual look for someone who wants the feel of modern up-town...and remember...you are not designing for you...you are designing for someone else; Someone who might not have the same likes or dislikes as you. You need to really listen to what your client wants. A happy client will make for a successful event!

T is for Time Frame
You have to know how much time you have to prepare. This could make or break your plans. If you have an elaborate set-up planned that includes time-consuming custom decorations, you will need enough time to execute this plan. If you find you are short on time, you will need to have a back-up plan, that includes rearranging and adjusting your original plan. Try to be realistic about what you can do in the time frame that is allotted for planning, prepping and executing your event. The most important thing to remember is to be flexible! More often than not, you will have to alter your course of action so be ready to go with the flow.

For those who aren't sure where to start with a plan, I really feel like this is a simple set of rules to follow. Not only will they help you plan your event, without a doubt you can execute that plan successfully! Ladies, I would love for you to add any ideas and input to this post. Let me know what you think! I hope this inspires you to take on a project that you never thought you could and that not only will you take it on, you will execute it beautifully. Keep me posted on your many decorating success stories in the New Year!

Friday, January 7, 2011

Lego Star Wars Birthday Party!

Okay so what do you do when your child wants a party theme that you cannot find the ready-made party supplies for? Do you pull your hair out? I almost did....but then I came across a blog  by Aimee Austin Designs where some ideas were posted of her version of a "homemade" Lego Star Wars Birthday party. It had some great ideas so I decided to take those ideas and come up with my own version of one. I was very happy with the end result. If you want to check out Aimee Austin's blog, here is the link: http://aimeeaustin.wordpress.com/party-time-lego-star-wars/
(I won't take credit for all the work, ha ha!)

Another great blog to check out for more Lego Star Wars ideas is Bliss Off:
http://www.blissoff.com/2010/06/06/star-wars-lego-birthday-party/
There were some super creative ideas posted there!

One last really neat place to check out is: http://www.livinglocurto.com/2009/08/star-wars-free-printable-tags-stickers/
At this site, you can download some really cute Lego Star Wars backpack tags and stickers. I found this site after I had done my party...wish I would've found it before. Oh well!

Once I got into the project and did a little research, I found several resources to use for the party and then I just filled in the gaps with a little creativity of my own. With a little elbow grease, some scissors, cardstock, glue and a good laser printer, I was able to make all of my own decorations.

For those of you who are interested in finding links to find some of the custom supplies, please check out the following sites to get those. What is great about the labels and invites is that you can just order the files and print directly from your own computer and printer:

custom invites and certificates:  http://www.princessandthepeas.com/


These are example copies of the products I ordered for our party. There are other designs to choose from. You can print as many as you like. I printed extras and used them to make my party favor bags.


We used plain silver and gold gift bags that we purchased from the dollar store and cut and glued our invite pictures on them and filled them with all sorts of goodies!


custom water bottle labels, cake topper & cupcake/cookie toppers:   http://www.ecrater.com/search.php?keywords=lego+star+wars&srn=1 (you will need to browse through the items to find all of the custom items available for ordering)


I had a friend make the cake (Thanks Carla!) and add the edible top design to it. Then we added Lego minifigures all around it to customize it!


These are edible cupcake or cookie toppers. They come in sheets of 12 per page and are super affordable. Each topper has a different Lego Star Wars character on it. I thought these were the neatest things!

Thanks to Aimee Austin...I followed her lead and made my own plates. I used plastic clear plates and used clear tacky glue to adhere the pictures onto the under side of them. The pictures were printed on my laser printer on regular printer paper. Very easy to do.


I made this homemade sign by taking a piece of black foam board and gluing all of my pictures onto it. I found pictures to print online by doing a search and browsing through numerous pics until I found what I was looking for.

We had a Star Wars table set up with the goody bags and all of the Star Wars memorabilia that we could find laying around the house.


I made my own paper chains to hang as decorations on several tables. On the top one, I used a custom water bottle label template that I ordered from ecrater.com and some colored paper. On the bottom one, I found some images on the internet by doing a web search.


These are pics of my party tablescape. I used crepe paper for the streamers and sprinkled confetti stars on the table top. I also hung homemade stars from the chairs and light fixture.


I used hollywood themed stars that I found at the Dollar store that came in a pack of 5 for $1 and spray painted them and glued printed pictures on them.

Here is a closer view of my cake and side decorations pieces.


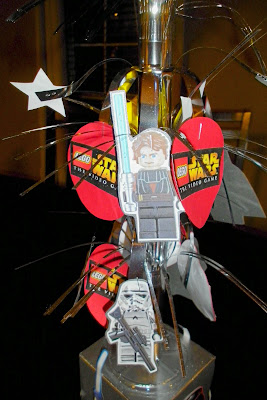
This is my interpretation of a decoration that Aimee Austin did. For mine, I used a tissue box and spray painted it silver. I then glued printed pictures around all four sides. I then found a plastic party centerpiece with streamers from the dollar store. It had stars, balloons and "happy birthday" signs stapled to the streamers. I removed those and added my own homemade cutout Lego Star Wars logos and minifigures to it.


We had a ton of light sabers so we made a lightsaber station and placed it next to the R2-D2 trashcan my son and I made. I am not an artist so it probably could've been better but....you get the idea. I used a dry erase marker to make a rough sketch on the trash can because you can wipe it off easily. Then I used metallic blue and silver craft paint and a black paint pen to complete the project. We kept R2-D2 and he now sits in my son's room and he uses it as a toy bin.


So that was our Lego Star Wars party! Even without readymade supplies we managed to pull it off! I hope our ideas inspire you to create your own Lego Star Wars party. It really can be easy to do. I would love some feed back and ideas from my readers so please comment!